Tuesday, May 14, 2013

Creating Plant/ Storage Location/Purchasing Org/Purchasing group

Creating a Plant

1. Type SPRO in command field and press enter.
2. Click on SAP Reference RMG or press F5
3. Follow the path Enterprise Structure --> Definition-->Logistics – General-->Define, copy, delete, check plant-->Copy, delete, check plant
4. Click on Copy as – In From Plant give any standard plant and in To Plant give your Plant number. It will copy all data from standard plant .So you don’t have to maintain much data. But if you don’t want to copy all data from the Standard Plant follow the following path IMG--> Enterprise Structure -->Definition-->Logistics – General-->Define, copy, delete, check plant-->Define Plant. Here you can change your Plant details also , like plant address. 
 

Assigning Plant to Company Code

1. Type SPRO in command field and press enter.
2. Click on SAP Reference RMG or press F5
3. Follow the path Enterprise Structure--> Assignment--> Logistics – General--> Assign plant to company code.
4. Here assign the Plant to the intended Company Code  

Creating Storage Location

1. Follow the path Enterprise Structure--> Definition--> Materials Management--> Maintain storage location.
2. Give your plant number (A storage location can not exist without a Plant. Its why at the time of creation of storage location it will ask the plant for which you want to create the storage location ) 
 

Creating Purchasing Organization

1. Follow the path Enterprise Structure--> Definition--> Materials Management--> Maintain purchasing organization.
2. Now click on New Entries, Give Purchasing Organization number and description.  

Assigning Purchase Organization to Company Code

1. Follow the path Enterprise Structure--> Assignment--> Materials Management--> Assign purchasing organization to company code.
2. Here assign your Purchasing Organization to your Company Code 
 

Assigning Purchase Organization to Plant

1. Follow the path Enterprise Structure--> Assignment--> Materials Management--> Assign purchasing organization to plant
2. Here assign your Purchasing Organization to your Company Code  

Creating Purchasing Group

1. Follow the path Materials Management--> Purchasing--> Create Purchasing Groups
2. Click on New Entries, Give purchasing Group No. , Description and other details like telephone no. , Fax No. 


Transfer posting and Stock transfer

What is Transfer Posting?

When there is a change is stock category or stock number of a material then that change is called as transfer posting.
Example of transfer posting : Unrestricted Stock to Quality Inspection Stock, Material to material.
Transfer posting may or may not involve a physical goods movement.

What is Stock Transfer?

When there is a movement of stock like plant to plant, company code to company code then that movement of stock is called as Stock transfer.


Example of Stock Transfer: Storage location to storage location stock transfer, Plant to plant stock transfer, Company code to company code stock transfer, warehouse to warehouse stock transfer.

Difference between transfer posting and stock transfer:-

The main difference between transfer posting and stock transfer is for stock transfer there is always a goods movement.

Transfer Posting:

• Stock to stock
Depending on the usability of a Stock there is three types of stock
1. Unrestricted –use
2. Quality Inspection
3. Blocked


When we need to change the stock type of a material we do the transfer posting. For example at the time of goods receipt the goods may go for a quality inspection. For that period the stock type of that much of material is Quality Inspection. After the quality inspection depending on the quality we post the material to unrestricted stock or blocked stock.

• Material to material
In industries like chemical and pharmaceutical it is often needed that we need to transfer the material no. to another because of some changes of the original material master records.


During material to material transfer posting we need to keep some basic things in mind.
1. Basic unit of measure: For both the material the BOM should be same otherwise system does not allow the transfer posting.
2. The transfer posting in done in one step.
3. For posting both the issuing and receiving material must be in unrestricted use.

Business example of transfer posting and solution:

Example 1: In Plant 0001, storage location 0001 there are Material XYZ in quality inspection stock .The inspection is done and now the business need the stock as unrestricted use stock.
Solution:

Prerequisite – You must have enough stock of material XYZ in your storage location as Quality Inspection stock.

1. Type MIGO in the command field and press enter.
2. In the first dropdown choose transfer posting.
3. In the second dropdown choose other and press enter.
4. Check the movement type at the right corner .If it is not 321 make it 321 as 321 movement type is used to transfer stock form block to unrestricted.
5. In the transfer tab under Dest in material field give material no XYZ, in Plant field give plant 0001, in storage location field give 0001 and press enter.
6. Select the quantity tab by clicking on quantity.
7. In Qty in unit of entry field give the quantity
8. Check the Item Ok check box
9. Now press F7 or click on Check Box in the upper left of the screen .If the document is ok you will get a message in the bottom part of the screen like “Document is O.K”
10. Click on Post button right beside the check button.

Now to check your stock
1. Type MMBE in the command field and press enter.
2. Give XYZ in material field, 0001 in plant filed and 0001 in Storage Location field.
3. Press F8.

Exercise of transfer posting:

1. In one of your material some defects have been found. Transfer some of the material to Quality Inspection stock.
2. You have two materials with same unit of measure. One is a good quality material (material A) and another is a poor quality material (material B).After some time 10 of good quality materials become poor due to some defects . Now you have to transfer those 10 good quality materials to poor quality material.
(Hint: Create two material, use movement type 309)

Stock Transfer

In stock Transfer we transfer some material from one organizational level to another .So for that we have two procedures.
• Two step procedure: Here we issue the goods from one organizational level in 1st step and in 2nd step we receive the goods in another organizational level.
• One step procedure: Here issue and receipt is done at once.

Storage location to storage location – one step

Few facts about storage location to storage location stock transfer
1. It is done within the same plant.
2. One material document is generated.
3. Generally no accounting document is generated. Accounting document is only generated if the material is split valuated and valuation type changes in the process of stock transfer.


Storage location to storage location –Two step

1. Goods are first issued in the issuing plant.
2. As soon as goods issue is done from issuing storage location instead of going to unrestricted stock of receiving storage location it goes to Stock in transfer.
3. In the second step goods receipt is done in the receiving storage location to transfer the stock from stock in transfer to unrestricted use.


Plant to plant stock transfer

1. Material Document is created during plant to plant transfer.
2. Accounting document is only created if the plants are assigned to different valuation areas.
3. If the plants belongs to different company codes then two accounting document is generated.

Plant to Plant stock transfer: One step procedure

Only one material document is generated.


Plant to Plant stock transfer: Two step procedure

1. Two material documents are generated.
2. Material is issued from one plant to another plant. After issuing the material it comes to the receiving plant as stock in transit material.
3. After issuing the material goods receipt is done and the material in stock in transit becomes unrestricted stock in receiving plant.


Business example of transfer posting and solution:

Example 1: In your plant 1000 material XYZ exists in both 0001 and 0002 storage location. In storage location 0001, 100 quantity of material XYZ exists. Business needs to transfer 10 of those 100 materials from storage location 0001 to 0002.

Solution: one step procedure

1. Type MB1B in the command field and press enter.
2. Fill the fields as Movement Type : 311 , Plant 1000 , Storage Location : 0001
3. Press enter
4. In Recv. SLoc field enter 0002
5. In the 1st line item in material field give material no XYZ , in quantity field give 10 , enter basic unit of measure in BUN field and press enter .
6. Save the document. Note down the generated Material document no.
Optional:
1. Check the Material document using TCODE MB03
2. Check the stock using TCODE MMBE .

Exercise of Stock Transfer:

Exercise 1: In your Company code 1000 material XYZ exists in both 0001 and 0002 plants. In plant 0001, 100 quantity of material XYZ exists. Business needs to transfer 10 of those 100 materials from plant 0001 to 0002.
(Hint : For one step use movement type 301 , for two step procedure 1st issue the goods from issuing plant using Movement type 303 and then receive the goods in receiving plant using movement type 305 )

Physical Inventory

What is physical inventory?

The process of counting physical inventory, posting corresponding document and posting the difference is called Physical Inventory.

Why we do physical inventory?

1. To know the correct stock in hand. Due to some inconvenience (like some materials have been stolen or broken) it may happen that the stock reflecting in sap system differs from the actual stock in storage location. Physical inventory is then carried out to synchronize the stock in hand with the stock reflecting in SAP system.
2. In many countries there is a law that Company have to do physical inventory to check the current stock in hand and that stock or assets is taken into consideration in Company’s financial statement.

At which level Physical inventory is carried out?
1. Material
2. Plant/storage location
3. Batch
4. Special Stock
5. Stock type
(These levels are called stock management unit. These are all an IM level. At WM level physical inventory is carried out at storage type and storage bin level)

Standard process flow of Physical Inventory


Alternative process flow of Physical Inventory


Important Tcodes in Physical Inventory


MI01 Create Physical Inventory Document
MI02 Change Physical Inventory Document
MI03 Display Physical Inventory Document
MI04 Enter Inventory Count with Document
MI05 Change Inventory Count
MI06 Display Inventory Count
MI07 Post Inventory differences
MI08 Create List of Differences with Doc.
MI09 Enter Inventory Count w/o Document
MI10 Post document, count and difference
MI11 Recount Physical Inventory Document
MI12 Display changes
MI20 Print List of Differences
MI21 Print physical inventory document
MI22 Display Phys. Inv. Docs. For Material
MI23 Disp. Phys. Inv. Data for Material
MI24 Physical Inventory List
MIAD Delete Phys. Inv. Documents
MIAR Archive Phys. Inv. Documents
MIDO Physical Inventory Overview
MB51 Material Document List

Physical Inventory Document

From a Physical Inventory document we can get the following information
1. Where the counting has been taken place ( eg Plant , storage location0
2. Count date
3. Which are the materials to be counted
4. The status of the items
5. The status of the Physical Inventory Document
6. The stock types to be counted

Post difference

1. When inventory difference is posted a Material document and if the material is valuated material then an accounting document is also posted.
2. A tolerance group for each user group can be maintained so that cone cannot post more than that difference .Tolerance group is maintained in IMG -> Materials Management -> Inventory Management and Physical Inventory -> Physical Inventory -> Define Tolerances for Physical Inventory Differences (Tcode OMJ2).
3. While posting the difference, one can maintain the reason for posting the difference also.
4. Be careful when posting the difference. The posting date should lie in the same posting period of the count entering date .If backposting is allowed the you can post the difference in following period also . If your posting date of the post difference is not satisfying these two conditions then you cannot post the difference.

Some important terminologies and settings in Physical Inventory


Posting Block
When you check the posting block check box for any physical inventory document, it will not allow any goods movement until the count results are posted. If you allow goods movement during counting inconsistency in counting result may occur due to that goods movement. So it is best practice to block the goods movement during counting.

Freeze book Inventory
When you check the freeze book inventory check box for any physical inventory document, it will allow goods movement but that will not reflect in the system until the count results are posted. If the time lag between physical inventory document creation and counting is high, this indicator is set, so that business can go on with goods movement. To use freeze book inventory you have to enable it by following the path given below.

IMG -> Materials Management ->Inventory Management and Physical Inventory -> Physical Inventory -> Allow Freezing of Book Inventory Balance in Storage Location.
If you don’t enable it and try to check Freeze Book Inventory while creating the document or changing the document then system will through the following error

Freezing of book inv. balance in stor. loc. is not allowed Message no. M7764

Adjusting book inventory
This is a customizing setting. These setting controls the system behavior when a material is subjected to active physical inventory goods movement of the same inventory has been posted. To set this indicator follow the path given below.

IMG -> Materials Management ->Inventory Management and Physical Inventory -> Physical Inventory -> Settings for Physical Inventory

Batches with deletion flag
If you wish to include those batches of a material that are flagged for deletion in the physical inventory document check this check box.

Business example of Physical Inventory count with solution

Example 1: In your Plant 0001 , storage location 0001 there are 10 nos. of material XYZ according to the SAP system .But physically the quantity is different ( assume only 6 nos. of the material exists in that storage location .Do the physical inventory and post the difference. And also block the goods movement during the counting.

Solution:

1. Create Physical Inventory document.
• Type MI01 in command filed and press enter.
• In plant field give 0001, storage location filed give 0001.
• Press enter.
• In material field give material no XYZ and press enter ( if the material is batch managed then enter the batch also )
• Save the document.
• Note down the document no.

2. Block the goods movement
• Type MM02 in command filed and press enter.
• Give the physical document number created in 1st step and press enter.
• Click on header (the CAP button ) or press shift + F4
• Check the Posting block check box
• Save the document.

3. Enter the count
• Type MI04 in command field and press enter.
• Give the Physical Inventory document no. and press enter.
• In the quantity field in the line item containing material XYZ give 6 and press enter.
• Save the document.

4. Post the difference
• Type MI07 in command field and press enter.
• Give the Physical Inventory document no. and press enter.
• In the reason field give 3 (damaged) and press enter.
• Post the document.
• Note down the material document no.

5. Optional but some important steps.

• Check the stock of material XYZ using TCode MMBE.
• Check the movement type of the material document generated in step 5.Type MB03 in command field. Press enter .Give the material document no. and press enter. Note that the movement type is 702.
• Check the accounting documents ----In MB03 on accounting documents. Note the accounting entries. In this case your Inventory account should be credited and Loss-difference account should be debited.

Step by Step guide : Quotation for procurement

Before purchasing something, often we visit more than one shop to get the best price . Similarly in a business before procuring the material we send a document to vendors requesting them to send their best price and conditions so that we can easily choose which vendor is best suited for us. In this case that document we send to the vendors is called RFQ (Request for quotation) and in reply vendors send us Quotation.

Business process

In this process buyer requests quotation for supply of a material to different vendors .Then he compares to find the best source of supply by evaluating the responses or quotation of the releavant vendors .The accepted quotation is then converted into a purchase order and rejection letters are sent to the vendors whose quotation were rejected.

Important TCodes or Quotation for procurement

TCode Transaction text

ME41 Create Request For Quotation
ME42 Change Request For Quotation
ME43 Display Request For Quotation
ME44 Maintain RFQ Supplement
ME45 Release RFQ
ME47 Create Quotation
ME48 Display Quotation
ME49 Price Comparison List
ME4B RFQs by Requirement Tracking Number
ME4C RFQs by Material Group
ME4L RFQs by Vendor
ME4M RFQs by Material
ME4N RFQs by RFQ Number
ME4S RFQs by Collective Number


Process flow


Process flow in details

• Creating request for quotation

1. Use traction ME41 to create the RFQ.

2. On the create RFQ screen make the following entries and then press enter.
• RFQ type – AN
• Language key – EN
• RFQ date – Today’s date
• RFQ Deadline Date – A date before delivery date
• Purch. Organization – Enter the Purchasing Organization (e.g. 0001)
• Purchasing group – Enter the purchasing group (e.g. 001)
(If you want to create the RFQ with reference to a purchase requisition, in ME41 transaction click on the “Reference to PReq” button and give your Purchase Requisition number.)

3. Now in the “Create RFQ: Item” Overview screen enter the details and press enter.
• Material – Material number for which you want to send RFQ
• Quantity – Any quantity ( e.g. 10)
• Delivery date – enter a date after the RFQ deadline date
• Plant – Give the plant no. ( e.g. 0001)

4. Now click on the Header Details (the cap button) or press F6
• Now in the “Coll. no.” field give any number in order to track multiple RFQs ( for
example enter Z0_01)
• Now click on “Vendor address” button or press F7. Give the vendor no. there . For one
time vendor give the address too .
• Now save the the RFQ and note down the RFQ number (displayed at the botton of the screen )

5. Repeat the steps 1 to 4 to send the RFQs to different vendors.

• List Requests of quotation (Optional)

In this step you can display the RFQs created in the previous step.

1. Run transaction ME4S

2. Enter the following data and press the button execute or press F8
• Collective number – enter previously given collective no. ( e.g. Z0_01)
• Purchasing organization – Enter the purchasing organization (e.g. 0001)
• Scope of list – ANFR ( RFQs with collective number)
• Purchasing group – Enter the purchasing group ( e.g. 001)

3. Here you can check the list .To check in more details select one line here double click on it .


• Maintain Quotation

In this step after getting the answers from vendors we maintain the quotation.

1. Run transaction ME47, give the quotation number and press enter.

2. Now in the “Maintain Quotation: Item Overview “ screen enter the net price in net price field and save it. ( To enter other condition types such as surcharge , freight cost , discount ,select the line and then click on the “Item Conditions” or press Shift + F6 and maintain it before saving)

3. Repeat step 1 and 2 to maintain other RFQs.

• Comparing, selecting and rejecting vendors

After maintaining all the necessary quotation we compare the quotations here .

1. Run transaction ME49

2. In the “Price Comparison List” screen enter the following data.
• Purchasing organization -- Enter the purchasing organization (e.g. 0001)
• Collective RFQ -- enter previously given collective no. ( e.g. Z0_01)
• Select “Determine Effective Price” and execute by pressing F8.

3. On the “Price Comparison in Currency XXX “ screen select the column of your favorite vendor and then click on the button “Maintain Quotation “ or press F2.

4. On the “Maintain Quotation: Item Overview “ screen, select the line items and click on “Item details “or press F2.

5. On the “Maintain Quotation: Item xxxxx” screen, under the Quotation Data section in the Info Update field, enter B (if you want for all plants select C) and choose Save.

6. Now if no updation is required or if you have already updated the Quotation save it and return to Price Comparison List.

7. Now to reject the other vendor select the column of that vendor in the "Price Comparison List" screen and click on the button “Maintain Quotation “ or press F2.

8. Here at you can see a column R (Rejection Indicator), select the check box and save the quotation.

9. Repeat step 7 and 8 to reject more vendors.

• Creating Source list (Optional)

In this step we automatically create the source list.
1. Run Transaction ME05.

2. Enter the following data and press the button execute or press F8
• Material – Give the material number
• Plant – Enter the plant number
• Change the valid to and valid from date accordingly
• Uncheck the Test run

3. Select the respective line item and save.

Standard Price & Moving average Price for Material

How the materials will be valuated is depends on the price control indicator in material master record. There are two types of price control indicator.
1. Standard price 2. Moving average price


Standard Price:

• When we select the standard price control indicator (S) in the material master record, any posting made to stock account is done at this price. While posting to stock account this price is taken as a standard. That’s why it is termed as standard price. Standard price of a material remains constant for atleast one period.
• Any variance is posted to price difference account.
• Variances are updated in moving average price for statistical purposes.

Advantage of Standard Price:
As this price is constant for atleast one period, it ensures the consistent cost management of production process and makes variances within production transparent.

Disadvantage of Standard Price:
As this price is constant for atleast one period, it does not reflect the actual cost incurred during the period. If the procurement price of the material changes greatly in that period, it can lead to an improper valuation price.


Moving average price:

When we select the Moving average price control indicator (V) in the material master record, any posting made to stock account is done at their actual price (as per purchase order, goods receipt, settlement etc.). With this price control indicator, a new material price is calculated after every goods movement, invoice, and /or order settlement. This material price is an average value calculated from the total inventory value and the total quantity of the material in stock. This is why it is termed as moving average price.


Advantage of Moving average price:

The material price is updated any price variance in in-house production as well as external procurement.


Disadvantage of Moving average price:

1. The main disadvantage of using the moving average price is that the price used to valuate a material consumption is almost completely dependent on the time at which the goods issue is posted in the system. Suppose we have done a goods issue and after that an invoice. But in this case the invoice value will be not reflected in the value of material issued .So the material is not valuated with its actual cost.
2. The moving average price can lead to an unrealistic price.
3. The moving average price is not period dependent. This can lead to a incorrect material valuation price .For example goods movement posting that are done in previous period is not valuated at the price form previous period indeed it is valuated at current price.

When to use Standard price and when to use Moving average price:
Some times it is very confusing when to use Standard price and when to use Moving average price.

The key for selecting the price control for a particular material is the fluctuation of the price of that material .If the prices fluctuates frequently then assign it to moving average price and if not then assign it to Standard price. SAP does not restrict you to choose the price control for a material but strongly recommends using Standard Price for Semi-finished and Finished materials( for more details refer to SAP Note 81682) . It is also recommended to use moving average price for those materials which are procured externally and standard price for those materials which are produced in-house.

Example 1:

Posting at Standard Price:

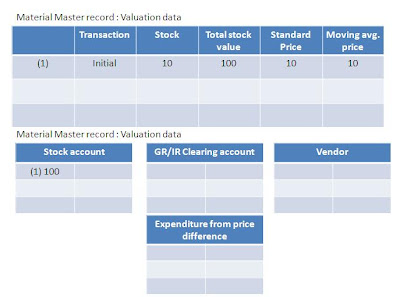
1. Initial situation :
• Material is valuated at standard price.
• Standard price = 10 INR
• Total stock value 10*10 INR= 100 INR
• Moving average price = 10 INR
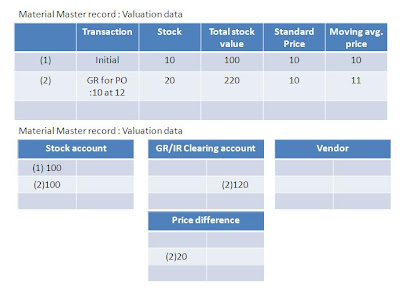
2. GR done for PO
• GR quantity =10 EA
• GR price per unit = 12 INR
• Initially the total stock value was 100. Now GR has been done for 10 materials at price 12 INR.
The new total stock value= (100+ 10*10 )INR=200 INR
• Standard price =10 INR(remains constant )
• Moving average price = (100+10*12)/(10+10)=11 INR
• As the good receipt is done at price 12 INR, GR/IR account will be credited by 10*12 INR = 120 INR.
• Difference of (120-100) INR =20 INR would be posted to price difference account.
3. IR done for PO
• IR quantity =10 EA
• IR price per unit = 11 INR.
• As the price control of the material is Standard, the total stock value remains same.
• Standard price =10 INR(remains constant)
• Moving average price =(100+10*11)/(10+10) INR= 10.5 INR
• At the time of goods receipt GR/IR account was credited by 120 INR. Now for balance at the time of Invoice GR/IR account will be debited by 120 INR , vendor account will be credited by 110 INR and the difference (120-110) INR = 10 INR will be credited to price difference account.

Example 2:

Posting at Moving Average Price:
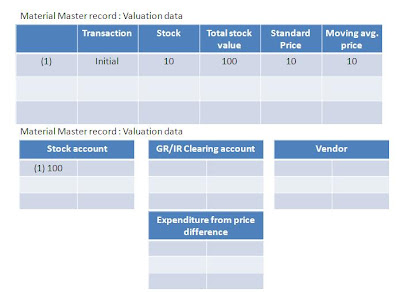
1. Initial situation :
• Material is valuated at Moving average Price.
• Total stock value 10*10 INR= 100 INR
• Moving average price = 10 INR
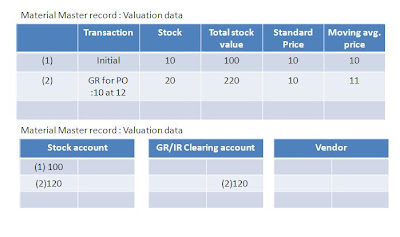
2. GR done for PO
• GR quantity =10 EA
• GR price per unit = 12 INR
Initially the total stock value was 100. Now GR has been done for 10 materials at price 12 INR. The new total stock value= (100+ 10*12 )INR=220 INR
• Standard price =10 INR(remains constant )
• Moving average price = (100+10*12)/(10+10)=11 INR
• As the good receipt is done at price 12 INR, GR/IR account will be credited by 10*12 INR = 120 INR.
• There will be no posting at price difference account as stock account and GR/IR clearing account is respectively debited and credited by the same amount.
3. IR done for PO
• IR quantity =10 EA
• IR price per unit = 11 INR.
• As the price control of the material is Moving average price and the IR price is less than GR price, stock account id credited by IR quantity * (GR price – IR price) = 10*(12-10) INR = 10 INR.
• Standard price =10 INR(remains constant)
• Moving average price =(100+10*11)/(10+10) INR= 10.5 INR
• At the time of goods receipt GR/IR account was credited by 120 INR. Now for balance at the time of Invoice GR/IR account will be debited by 120 INR , vendor account will be credited by 110 INR and remaining (120-110) INR = 10 INR will be credited to stock account.


Moving average price and price difference account:
Whenever there is a price variance during goods posting or invoice posting, in case of standard price, a price difference account is being hit to nullify it.
When the price control is moving average price there are also some cases when price difference account is hit. To understand under what circumstances price difference account is being hit inspite of moving average price as price control indicator go through the below mentioned example.

Example 3:

Initial Situation:
Moving average price: 10 INR
Total stock quantity: 10 EA
Total stock value: 100 INR

Now an invoice for 40 material with price variance of 5 INR ( ie the invoice price per unit = 10 INR- 5 INR =5INR ) have to be posted . So the stock account should be credited ny 5*40 INR = 200 INR . But the total stock value is 100 INR.

In this case the system credit the stock account by 10*5 INR =50 INR, and post the remaining 30*5 INR = 150 INR to price difference account.

Negative moving average price
Sometimes we can not post an invoice due to error like “Moving average price for material is negative: Mat XXX plant yyy.” , message no. M8783.
To understand why this kind of situation happens, go through the following example.

Example 4:

Initial situation:
Moving average price: 10 INR
Total stock quantity: 10 EA
Total stock value: 100 INR

Now you create an invoice for same material with quantity 6 EA and price 30 INR .So the price variance is (30 -10) INR = 20 INR. In this situation at the time of invoice posting the stock account should be credited by 6*20 INR = 120 INR.

But total stock value is only 100. So the system can not deduct 120 INR from 100 INR because that will lead to a negative stock value, which in turn lead to a negative moving average price. For this reason the system throws Error message no. M8783 and prevents the posting.

Now here one question may arise that why system is not posting the rest amount to PRD account.
The answer is very simple. If the system allows us to post the invoice by posting the difference to PRD account then 100 INR will be credited from stock account and 20 INR will be credited to PRD account. But then total stock = 10 EA, and total stock value =0. This leads to a zero moving average price which again may lead to an error during inventory postings.

Monday, May 13, 2013

Authorization objects used in cFolders

Authorization object ACO_OTYPE / ACO_SUPER
Value Description
structure cFolders: Bill of Material
s_item cFolders: BOM Item
Hyp cFolders: Bookmark
Col cFolders: Collaboration
Ds cFolders: Data Sheet
Dis cFolders: Discussion
Doc cFolders: Document
Fol cFolders: Folder
Mat cFolders: Material
Txt cFolders: Text
stat_actn Status Management Action
stat_prof Status Profile
stat_trans Status Transition
statfldgrp Field Group Status
Status Status

Authorization object CFX_USER (‘cFolders User’):
This authorization object must be assigned to the user who wants to use cFolders.
Authorization object CFX_OBJ (‘cFolders Top Level Objects’):
It controls authorizations for creating and deleting status networks, user groups, and collaborations in the different scenarios. This authorization object only controls the principal authorization for creating and deleting status networks, user groups, and collaborations. It does not control whether a user has authorization for a certain object.
Value Description
col Collaboration
comp Competition
ntf_tmpl Notification Template
stat_prof Status Profile
stdpart Standard
usrgrp User Group

Permitted activities:
  • Create or generate
  • Delete
Authorization object CFX_APPL (‘Application Area in cFolders’):
If a user has authorization for this authorization object, he or she can make administrative settings.
Use:
  • 'Network_Definition': Setting up the network, for example, absolute URL or FTP server settings.
  • 'Content_Definition': Setting up cFolders content, for example, adding generic objects; choosing scenarios to use.
  • 'Layout_Definition': Setting up the cFolders layout, for example, style sheets.
Permitted activities:
  • Change
  • Display
Authorization object CFX_NTF_T (‘Authorization object for Notification templates’):
Permitted activities:
  • Create or generate
  • Delete
Authorization object CFX_BPSRCH (‘For business partner related data search’):
This authorization object must be assigned to users who want to perform business partner related data search . This object would be assigned to the SAP_CFX_BP_SEARCH role.
Permitted activities:
  • Display
Authorization object CFX_PRF_AS (‘Assign a status Profile with only write authorization’):
Permitted activities:
  • Assign

Wednesday, May 8, 2013

Scheduling a New Job in SAP

1. Log on to the appropriate SAP instance.
2. Go to transaction SM36.
3. On the Define Background Job screen, fill in the Job name field with the new job name.

Select a Job Class priority of A for High, B for Medium, and C for Low.

It is SAP’s recommendation that all client-owned jobs begin with a Z for identification purposes. And most Basis people recommend the next two characters be the initials for the SAP module for which the SAP instance runs. Like ZBC* for a Basis job, and ZHR* for a Human Resources job.

Click on the Specify start condition button or press F5.

4. On the Start Time popup, click the Immediate button to start the job right away, or click the Date\Time button to specify a date\time in the future for which the job run.

Click “on” the Periodic job radio button and then click the Period values button if you want to schedule to job to run on a periodic basis.

Provide the periodic values and click Save back to the main Define Background Job screen.

5. On the main Define Background Job screen, click the Step button.
6. On the Create Step 1 popup, fill in the ABAP program Name and any Variant needed to run the program 7. Back on the Define Background Job screen, check that all the job information is correct and then click the Save button one last time.
8. For checking the scheduled job,  Go to transaction SM37 and give the job name and check scheduled check box and execute.